everything you need to know about parts of a toilet tank
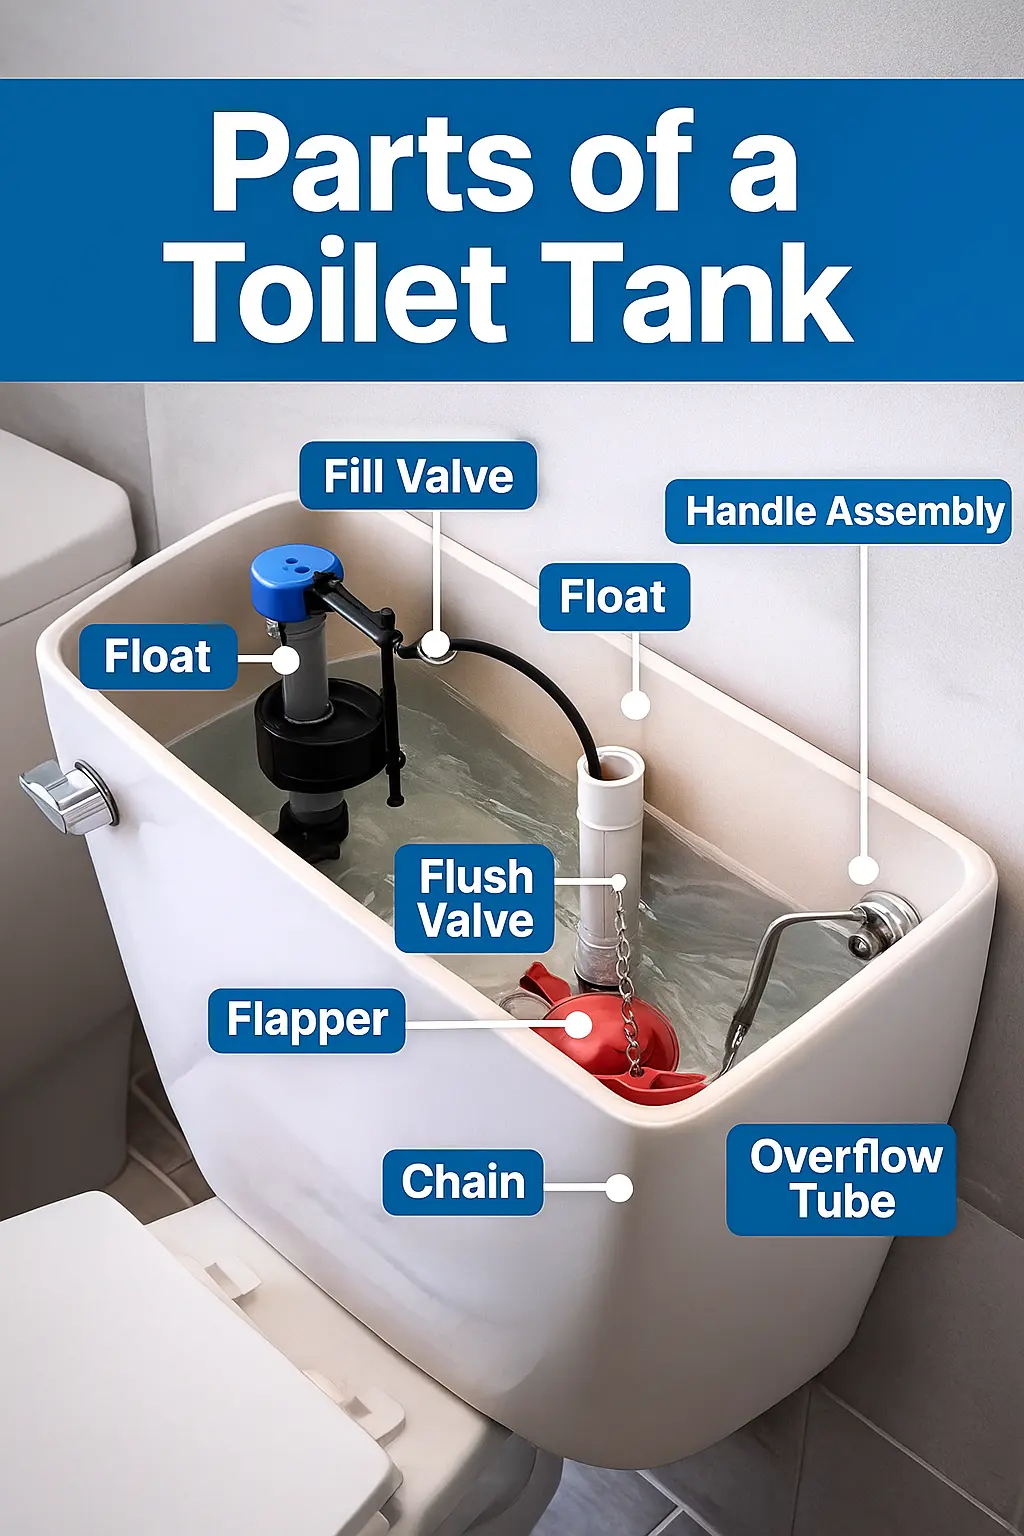
A toilet tank may look simple on the outside, but inside it contains several essential toilet tank parts that control filling, flushing, water flow, and overall functionality. Understanding the parts of a toilet tank helps you diagnose problems, replace worn pieces, and keep your toilet working smoothly. This guide explains toilet tank parts, how they work, symptoms of failure, and safe DIY steps you can do at home.
diy difficulty summary
|
Difficulty |
3/10 |
|
Time Required |
10 – 30 minutes |
|
Skill Level |
Beginner |
|
Risk Level |
Low |
tools needed
You don’t need advanced plumbing tools. The following basic tools work for replacing most parts of a toilet tank
- Adjustable wrench – For loosening tank bolts or fill valve nuts
- Screwdriver set – For handle mechanism or tank bolts
- Flapper replacement kit – For worn or leaking flappers
- Fill valve kit – For water filling or running toilet issues
- Pliers – Helpful for stubborn chain or nut adjustments
- Towel or sponge – To soak small remaining water in the tank
- Bucket – In case you need to catch water during removal
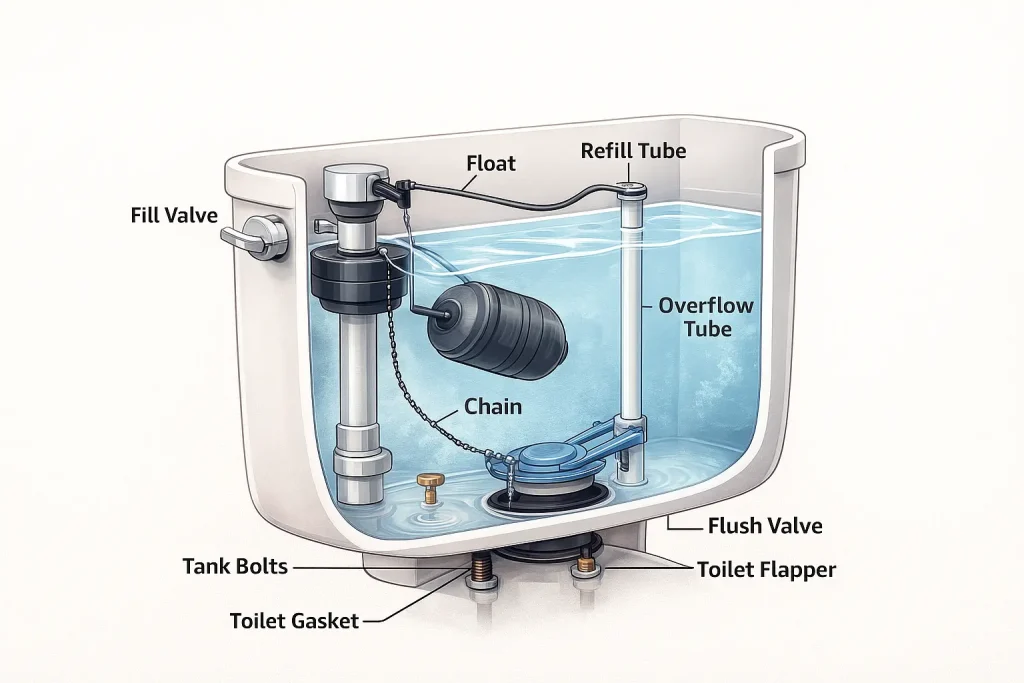
toilet tank parts diagram (visual Overview)
A toilet tank contains several internal parts that work together when you flush. If you’re looking for a toilet tank diagram, this section explains what each labeled part does so you know exactly what you’re looking at inside the tank.
symptoms of problems inside a toilet tank
If any toilet tank parts stop working, your toilet will usually show clear symptoms:
- Toilet runs constantly
- Weak or incomplete flush
- Toilet won’t flush properly
- Water fills too slowly
- Toilet flushes on its own (ghost flushing)
- Water level too high or too low
- Bubbles or gurgling noises in the tank
- Handle feels loose or doesn’t lift properly
These issues almost always point to worn toilet tank pieces like the flapper, fill valve, float, or flush valve.
common causes of toilet tank problems
Most toilet tank issues come from simple, worn-out parts that are easy to replace:
- Sticking toilet flapper: Causes running water or weak flushes
- Worn toilet fill valve: Toilet fills slowly or never stops filling
- Damaged flush valve seal: Causes leaks between tank and bowl
- Improper float height: Causes constant running or weak flushing
- Loose chain: Handle lifts but flapper doesn’t open fully
- Worn toilet gasket or tank bolts: Causes tank leaks
- Misaligned refill tube: Leads to poor bowl refilling
These common causes often require only basic toilet tank replacement parts.
safety warnings (read before you start)
Working inside a toilet tank is generally safe, but follow these precautions:
- Turn off the water supply valve before removing any toilet tank pieces
- Flush to empty the tank before replacing parts
- Avoid overtightening nuts — porcelain cracks easily
- Never force parts that feel stuck
- If water line valves won’t shut off, stop immediately
- Do NOT attempt supply line or pipe cutting — call a professional
complete guide to toilet tank parts
Below are the most important toilet tank parts found in almost every toilet.
|
Part |
What it Does |
Common Symptoms |
|
Fill Valve |
The fill valve controls how water refill into the tank after each flush. When it stops working, the toilet may fill slowly or continuously run. |
|
|
Flush Valve |
This large valve sits in the center of the tank and directs water into the bowl during flushing. |
|
|
Flapper |
The flapper acts as a seal at the bottom of the tank. When you lift the handle, a chain pulls the flapper up to release water. |
|
|
Overflow Tube |
This vertical tube prevents the tank from overflowing by directing excess water into the bowl. |
|
|
Float (Ball or Cup Style) |
The float controls the fill valve. As the water rises, the float shuts off the fill valve when the water reaches the right level. |
|
|
Chain & Handle Assembly |
Handles lift the flapper via the chain. If either is misaligned, the toilet may not flush properly. |
|
|
Tank Bolts & Gasket |
These parts seal the tank to the bowl. When they weaken, leaks occur around the toilet base or between the tank and bowl. |
|
|
Refill Tube |
This small tube refills the toilet bowl after each flush. |
|
how to replace basic toilet tank parts (beginner-friendly)
step 1 – turn off the water supply
- Turn the shut-off valve clockwise
- Flush to empty the tank
- Use a towel to remove remaining water.
step 2 – remove the old flapper
- Unhook the chain
- Detach flapper from side pegs
- Install the new flapper
- Adjust chain so it has slight slack
step 3 – replace the fill valve
- Unscrew the locknut under the tank
- Remove old fill valve
- Insert new valve and tighten
- Reconnect fill tube
step 4 – adjust the float
- Raise the float to increase water level
- Lower the float to reduce water level
- Ensure water stops 1 inch below overflow tube
step 5 – test for leaks
- Turn water back on
- Inspect base of tank, bolts, and valve
- Fix any drips immediately
Step 6 – restore normal operation
- Flush once
- Confirm strong flush and proper refill
- Re-adjust float if needed
when to call a professional plumber
Call a professional if:
- Tank is cracked
- Water supply valve won’t shut off
- Leak comes from wall or supply line
- New parts don’t fix running toilet
- Tank bolts are rusted and won’t loosen
- You suspect a deeper plumbing issue
prevention & maintenance tips
To keep your toilet tank working properly:
- Replace the flapper every 1–2 years
- Check fill valve annually for slow filling
- Clean the inside of the tank with vinegar (never harsh chemicals)
- Make sure refill tube is clipped above overflow tube
- Tighten handle and chain as needed
- Inspect tank water level monthly
troubleshooting table
|
Symptom |
Likely Cause |
Quick Fix |
|
Toilet runs constantly |
Worn flapper or high float |
Replace flapper / adjust float |
|
Weak flush |
Low water level / partial clog |
Raise float / check flapper |
|
Water leaking into bowl |
Flapper not sealing |
Replace flapper |
|
Slow tank refill |
Bad fill valve |
Replace fill valve |
|
Toilet won’t flush |
Loose chain or handle |
Tighten chain / handle |
|
Water at base of tank |
Worn gasket or bolts |
Replace gasket / tighten bolt |