Everything you need to know about attaching a ceiling fan
Attaching a ceiling fan may look intimidating, but with the right tools, safety steps, and proper mounting hardware, it’s a project most homeowners can complete confidently. Whether you’re replacing an old light fixture or installing a brand-new fan, it’s crucial to use a fan-rated ceiling box, a secure ceiling fan mounting bracket, and follow the correct wiring and installation steps.
This complete guide walks you through tools, safety warnings, step-by-step installation, troubleshooting, and common mistakes — all written in clear, beginner-friendly language. By the end, you’ll know exactly how to install a ceiling fan safely and correctly.
DIY Difficulty Summary
|
Difficult |
5 / 10 |
|
Time Required |
45 – 90 minutes |
|
Skill Level |
Beginner / Intermediate |
|
Risk Level |
Medium (electrical + ladder safety required) |
Attaching a ceiling fan is manageable for most homeowners, but it does involve wiring, mounting brackets and working overhead.
Tools Needed
Before you begin, gather the tools below to ensure a smooth installation:
- Screwdrivers (Phillips and flathead)
- Wire stripper
- Needle-nose pliers
- Ladder
- Voltage tester
- Electrical tape
- Wire connectors (wire nuts)
- Fan-rated electrical ceiling box
- Ceiling fan mount brackets (included with most fans)
- Drill + wood screws (if needed for joist support)
Having all the tools ready will make attaching your ceiling fan much safer and faster.
Common Causes of Ceiling Fan Installation Problems
Most ceiling fan installation problems come from simple oversights or incorrect mounting. Common causes include:
- Using a standard electrical box instead of a fan-rated box.
- Installing a ceiling fan mounting bracket incorrectly
- Loose screws in the mount or fan motor housing
- Weak support from the ceiling joist
- Incorrect wiring connections
- Fan blades installed unevenly or not tightened
- Mounting a ceiling fan bracket on drywall anchors (unsafe)
Understanding these issues helps you avoid wobbling, noise, and long-term structural problems.
Symptoms of a bad Ceiling Fan Installation
If your ceiling fan isn’t installed properly, you may notice:
- Fan wobbling at higher speeds
- Clicking on rubbing noises
- Fan moving or shifting on the bracket
- Light flickering or turning off randomly
- Burning smell (dangerous – stop immediately)
- Unusual vibrations
- Loose screws or visible bracket movement
A properly attached ceiling fan should be tight, quiet, and stable.
Safety Warnings (Read Before You Start)
Working with electricity and overhead mounting requires caution. Always follow these warnings:
- Turn off breaker powering the ceiling fan circuit
- Confirm power is off using a voltage tester
- Never mount a ceiling fan to a standard (non-fan-rated) electrical box
- Ensure your ceiling joist can support the fan’s weight
- Use only the manufacturer-provided ceiling fan hanger bracket
- Avoid touching bare copper wires
- Do not install a fan on a cracked or unstable ceiling
- If wiring looks old or damaged, call a professional
Safety first – improper mounting can lead to falling to falling fans and electrical hazards.
How to attach a ceiling fan (Step-by-Step guide)
Step 1 – Turn off power & remove the old fixture
- Switch off the breaker
- Remove the old light or fan
- Disconnect the wiring safely
- Inspect wire condition before moving forward.
Step 2 – Check If your ceiling fan electrical box is fan-rated
A ceiling fan requires a UL fan-rated box designed for heavy loads and movement. If yours is not fan-rated, replace it before proceeding.
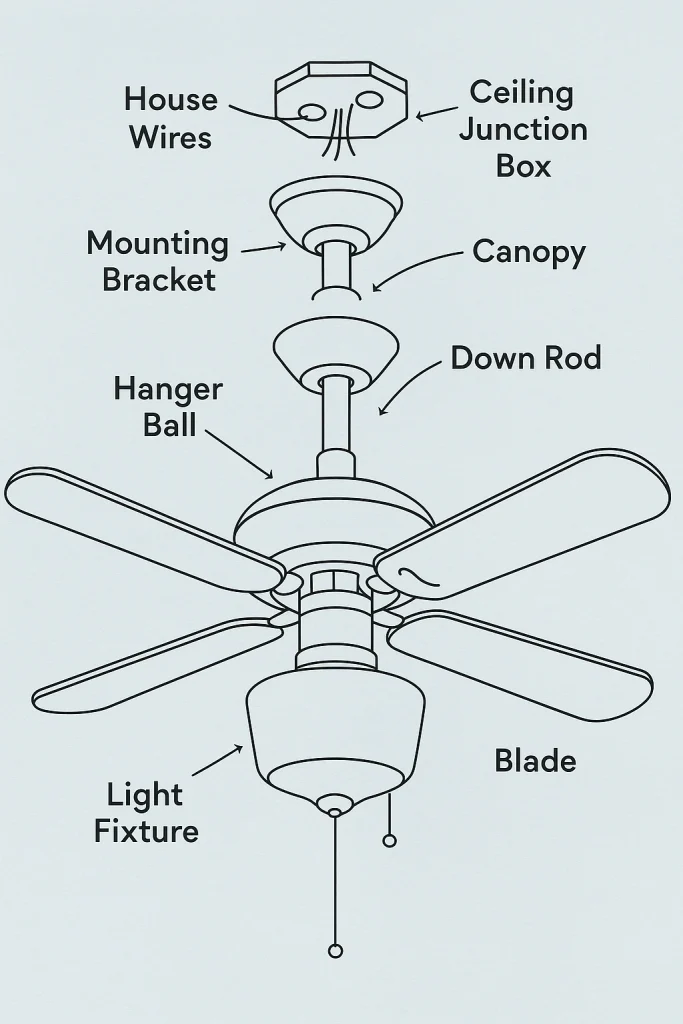
Step 3 – Install the Ceiling Fan Mounting Bracket
Your fan should include a ceiling fan hanger bracket. To attach it:
- Position it directly over the fan-rated box
- Align bracket holes with box holes
- Tighten screws firmly
- Ensure zero movement when you pull gently
This bracket is what supports the entire fan, so it must be tight and secure.
Step 4 – Assemble the fan motor housing
Most fans require partial assembly before hanging:
- Attach downrod (if included)
- Secure screws tightly
- Feed wires through the downrod
- Prepare the motor housing for mounting
Step 5 – Hang the Fan on the Bracket (Temporary Hook Method)
Many brackets include a small hook or groove so you can hang the fan temporarily, making wiring easier.
- Lift the motor housing
- Hang it on the hook
- Confirm it’s stable before wiring
Step 6 – Connect the Wiring
The wires
- Black → Black (fan motor hot)
- Blue → Light kit hot (if included)
- White → White (neutral)
- Green/bare → Ground wire
Secure all wire connections matching with wire nuts and electrical tape.
step 7 – Attach the fan blades in light kit
- Install each blade evenly
- Tighten all screws fully
- Install the light kit if included
- Check blade alignment
Uneven blades often cause wobble.
Step 8 – Test the Fan for Wobble & Noise
After restoring power:
- Test each speed
- Check for sway or vibration
- Tighten any loose screws
- Use a balancing kit if needed
A correctly attached ceiling fan should run quietly and smoothly.
When to Call a Professional
Hire a pro if you encounter:
- Old or unsafe wiring
- No fan-rated ceiling box
- Cracked or weak ceiling joists
- Aluminum wiring
- Unstable or moving brackets
- Any burning smell or sparks
Electrical issues can quickly become fire hazards.
Prevention & Maintenance Tips
to keep your ceiling fan safe and sturdy:
- Tighten all screws 6-12 months
- Dust fan blades regularly
- use only UL-listed mounting brackets
- Avoid pulling on chains aggressively
- Check for wobble after seasonal changes
- Inspect brackets for stability once a year
Troubleshooting Guide
|
Symptom |
Likely Cause |
Quick Fix |
|
Fan wobbles |
Loose bracket or uneven blades |
Tighten screws, balance blades |
|
Fan won’t turn on |
Improper wiring |
Recheck connections |
|
Clicking noise |
Loose blade screws |
Tighten screws |
|
Fan shakes |
Weak ceiling joist |
Reinstall with proper reinforcement |
|
Light flickers |
Bad wire connection |
Re-secure wire nuts |
|
Fan moves on bracket |
Loose mounting screws |
Tighten or replace bracket |
|
Burning smell |
Electrical short |
Shut off power immediately |